In a data table, it’s common to click on a column header to sort the data in that column. However, it’s rare to encounter a FileMaker system that does this elegantly; I’d like to present a solution that makes column header sorting in FileMaker more modular, and hopefully you’ll agree that it’s more elegant as well.
There are a couple of techniques that I use in this post that are somewhat uncommon. I’ll outline them below, and then show you how it all comes together.
The Techniques That Make This Possible
Sort Records by Field
This script step has been around since FileMaker Pro 12. Despite its longevity, a lot of people don’t know how to take full advantage of this; I think the name of this script step may be partially to blame. Most developers use this script step, but always specify a field when setting it up.
Did you know that you can use this script step without specifying a field? This way, it will operate using the currently active field. Because of this hidden feature, we can make our sorts modular and use them on our list view layouts without any further modification.
Button Bars as Layout-Level Calculations
When developing in FileMaker Pro, you’ll sometimes need the content of a label to dynamically change based on certain conditions; there are many ways to accomplish this. Some developers will choose to create a new calculation field in one of their tables whose formula will spit out the proper output. Others will create multiple labels and simply hide/show labels according to various conditions. I have recently taken a liking to using a single segment Button Bar, and writing my conditions into the formula for its label there. In my humble opinion, this is great because it doesn’t clutter up your database schema or your layout, and it keeps the logic where it’s most relevant. This article is a great read on the versatility of button bars.
Our Plan
Before we get into the details, let’s take a moment to look at an example screenshot from a system that is already set up for elegant sorting.
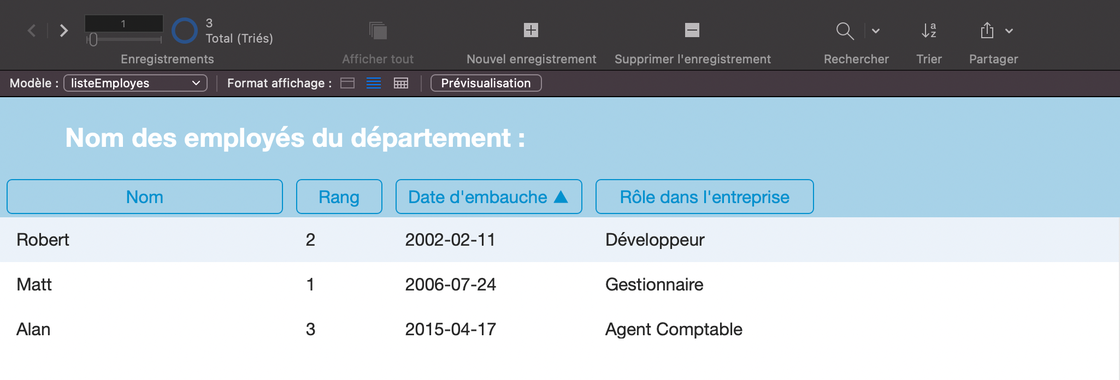
In this layout, there are quite a few sortable columns, which is one of the reasons I wanted to simplify things a bit. It’s clear by just looking at this screenshot that one of the columns is sorted already too. That’s where we’ll be once we’re done here.
Back to our Scheduled Programming
Create A Custom Function
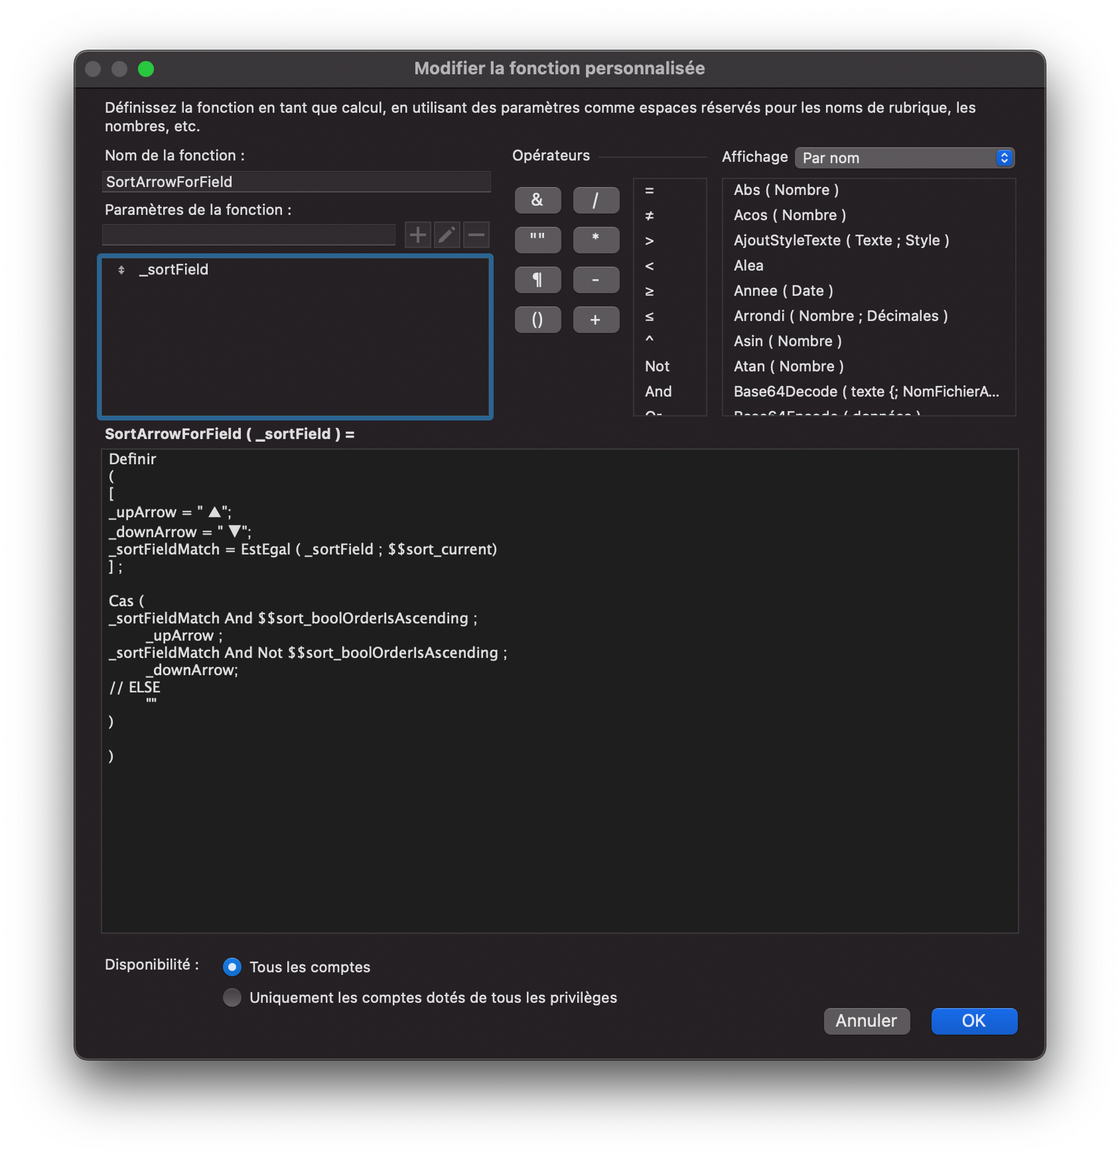
Since one of our goals is to keep our code elegant, we’re going to be creating a custom function. Doing so will make all of our code easily readable as we progress through this exercise. This custom function will accept a field reference name as a parameter (_sortField). It will return an arrow if the referenced field is the one used in the most recent sorting operation. More specifically, it will return an up arrow if that field is sorted in ascending order, and a down arrow if sorted in descending order. We will be using this custom function in the labels for our column headers below.
Please note, I used this page to help me find text-representations of arrows that I could use in this custom function.
Column Headers
Let’s define a single-segment Button Bar for each column header on our list view. Doing so will let us have both the button functionality we need, and the calculation functionality we need to determine what the label will say (allowing us to use our custom function) .
In the Specify Calculation window that lets you define the label for each of these, you’re going to want a formula along the lines of:
"Actual Label" & SortArrowForField ( "ActualLabelReferenceName" )« Actual Label » is what the column header will actually say.
« ActualLabelReferenceName » is a unique name of our choosing that we will use when referencing this column. We’ll refer to this as the Reference Name below.
Taking a Step Back
At this point in time, we’re already at the point where we’d normally want to start scripting the sorts. However, we’re not quite ready for that. Let’s take a step back and reflect.
In my case, the layout I’m using doesn’t allow for field-entry while the user is in browse mode. That means that I cannot make any of the fields in my list active. Therefore, the approach discussed above would not work for us. If you are able to click into fields from your list while in browse mode, then you can skip this part.
If you have the same issue, then no need to worry. We can overcome this.
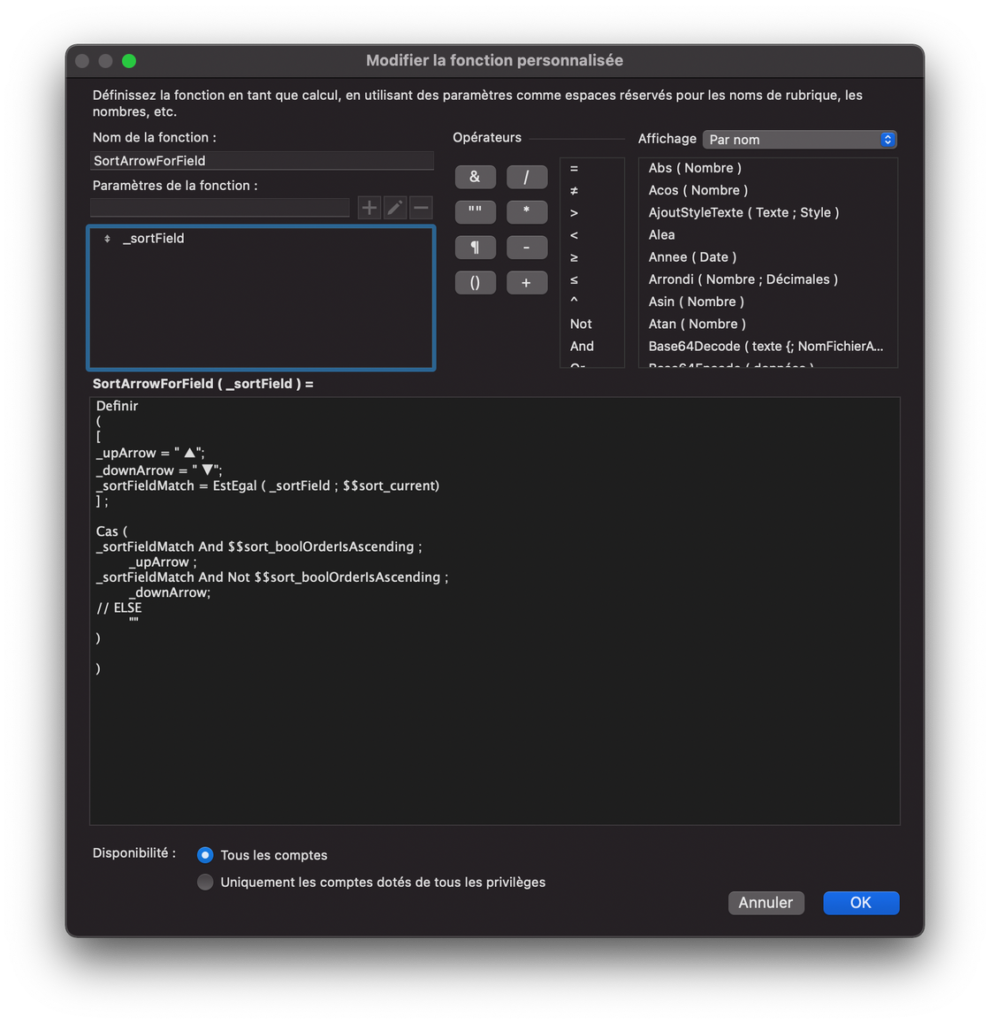
A simple solution is to duplicate each of the fields that shows up in list view. Each new version of those fields should have at least two settings applied:
- Make sure that the fields are enterable while in Browse mode
- Set their Hide When condition to True (so that they’re always hidden)
I’ve coloured my hidden fields with a green fill-colour to distinguish them from regular fields. You’ll only be able to see those green-coloured fields while in Layout mode; your users will never see them nor be able to interact with them directly.
Connecting our Buttons to Fields

Now that our fields can be active, we can continue on our journey. Now we’re going to link our column-header buttons to corresponding fields. We will use a simple naming convention for each of our enterable fields. Each field can be given an object name using the Inspector.
If you didn’t create these fields earlier, be sure to apply a similar naming convention to the actual fields in the body of your list view instead.
We can prefix each of these object names with « sort_ ». After the prefix, we’ll use the same Reference Names used in the corresponding button bars.
Scripting the Sorts
Now that all fields have object names, we can add a generic script to our system. This is the script we’ll use across all of our List View Layouts. It’s pretty simple once you break it down.
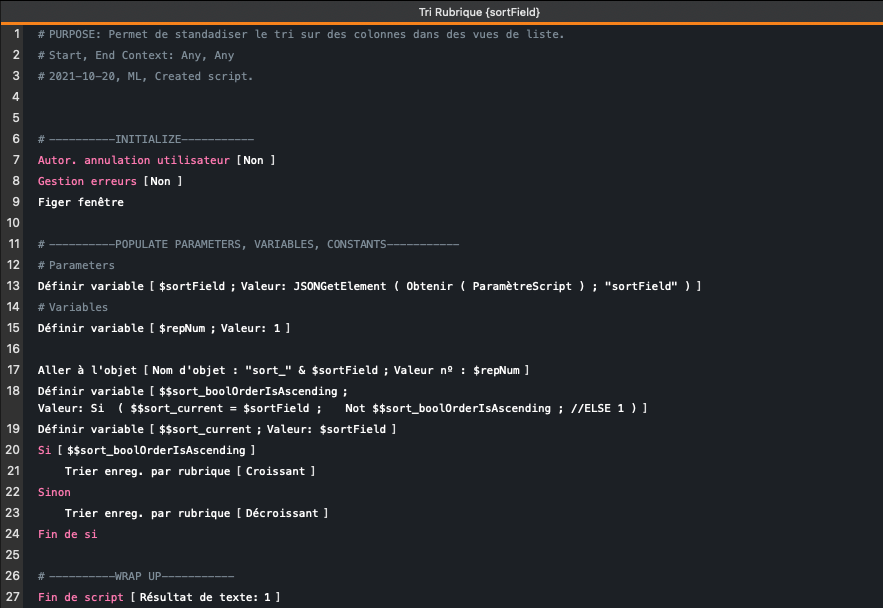
This script:
- Grabs the script parameter
- Determines what the sort direction is going to be (ascending or descending)
- Stores the sort field’s reference name and sort direction in global variables
- Performs the sort
Of course, this script could be improved with proper error handling, etc., but I wanted to keep things simple for the purpose of this tutorial.
Using the Sort List Script
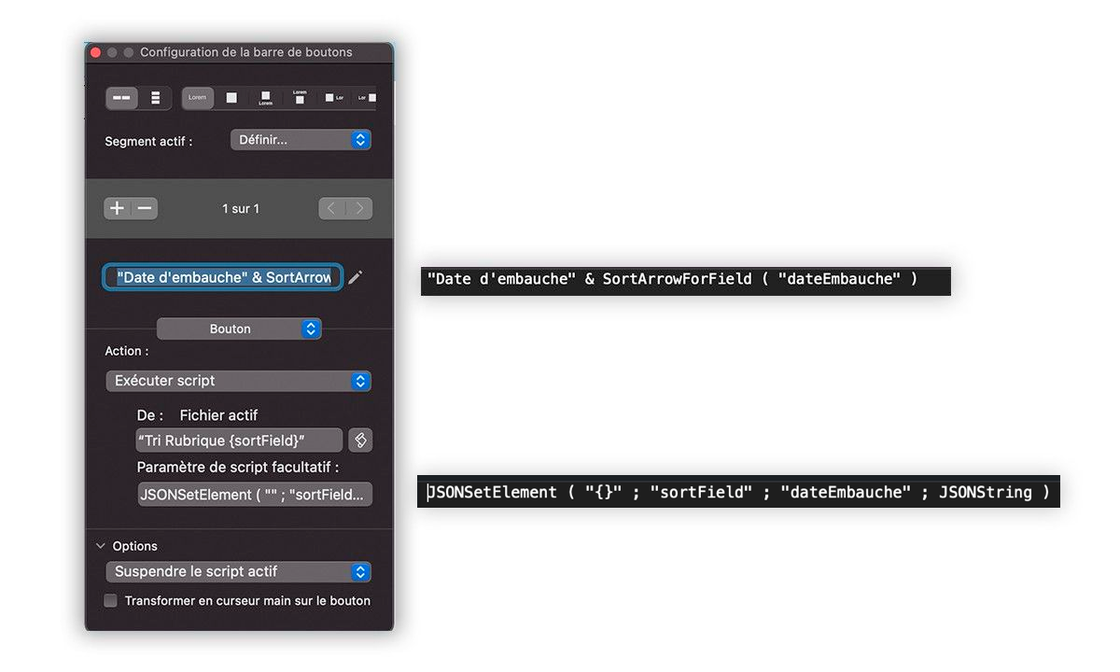
Now that our sort script is written, let’s put it to good use. Each of our column headers should already be a Button Bar with a single segment. All that’s left to do is to give the Button Bar Segment an Action. We’re want to perform a script when the button bar is pressed, and we want to pass in the proper Reference Name that we specified in an earlier step.
It should look something like this (pictured right). Once you’ve done something similar for each of your column headers, go ahead and give it a shot. You should already be sorting.
We’d love to know if this method works for you, or if you have a different preferred method for sorting columns. Let us know in the comments, and happy developing! We’re always here if you need a hand with your FileMaker solution.
